I can't remember how I found this site - I think I was browsing through seriouseats.com one afternoon - but am I glad I did. Apartment Therapy's The Kitchn presented a different idea from The Bread of last year - the No-Knead Bread - with their idea of No-Time Bread. Instead of throwing everything in a pot and leaving it for 24 hours before cooking it, this bread only takes 1 hour before it's done. What? I hear you say. Bread from scratch in an hour? Not Possible! You're pulling our legs. No, No! I profess - I promise you here and now. Fantastic bread, with a great crumb and even better crust, in only ONE hour!
So, if you are craving that fresh bread feeling, but don't have the time to set your bread maker, or indeed want the bread today instead of tomorrow, then is this the recipe for you! Yes, you too can produce this sort of good-lookin' loaf this evening!
TheKitchn's No-Time Bread Recipe
4 1/2 teaspoons active dry yeast (two packets)
1 tablespoon sugar
1 1/2 cups water
3 1/2 cups bread flour
1 1/4 teaspoon salt
3/4 teaspoon balsamic vinegar
Implements you need:
If you have a mixer - the mixer + paddle & dough hook attachments. If you don't have a mixer, a big bowl, counter space + a bit of extra flour + something to mix the dough up to begin with (I use a pastry cutter thingy).
Also - a casserole dish (or dutch oven if you've got one) to bake the bread in, a microwaveable bow, and two towels. And a bit of oil.
Let's get going!

Easy to put your hands on ingredients too. Nothing fancy here.
First thing to do? Get that yeast activated.
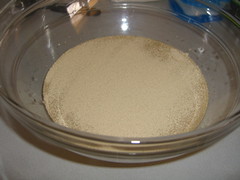
It's been a bit cold here recently (it's summer, although you'd never guess it, for which I am eternally grateful. Having a summer with days in the 20's (Celsius) is infinitely better than in the 40's (still Celsius..) in my opinion. But it doesn't lend to having warm patches of heat in the house when it's been around 10C the night before...) and I've been having trouble with my yeast fu, so I've taken to popping my oven on very low (the dial is set to a spot before the little notches begin, so I'd say about 50C?) and putting the bowl in there to warm up and get the yeast feeling funky. Works well enough for me!
If you're using a mixer, chuck it all in the bowl of the mixer and let it rise in there.
When the yeast has activated and you've got a mass of bubbling goodness, get the bowl ready to have the flour added. At this point, it's a very good idea to get the oven ready for your bread. The key to this bread, is the oven is very hot, and you warm up the dish (with lid) that you're going to bake the bread in, as the oven is heating, so the dish is the same approximate temperature (darned hot) as the oven. I've been using a Pyrex casserole dish, and I wasn't sure when I first bake the bread that it would be big enough. It is, but the bread bakes flat on top because it grows right up to the lid. In fact, the first time I baked it, when I reached into the oven to take the lid off the pot, it was sitting up OFF the top of the pot, the bread had risen that much!
And I've gone totally away from the recipe. SORRY! My point was, that at this stage, put your lidded pot into the oven, and turn the oven up to 220C (450F).

Activated yeast. Add the 3/4 teaspoon of balsamic vinegar, and then the 3 cups of flour + 1 1/4 teaspoon of salt into the bowl.
At this point, I must digress a little again. The recipe from The Kitchn @ Apartment therapy states that you put all the ingredients into a mixer and set it going for 2 minutes to combine with the paddle. I don't HAVE a mixer, so I just get out my pastry cutter and mix it all up. However, if you do have a mixer, please use it. I would, if I had mine around.
Since I don't, I mix it until it's combined and looking good.

At this point, or just after, I add the extra 1/2 cup of flour. If you've got a mixer, add the last 1/2 cup of flour after kneading the previous mixture for 2 minutes with the paddle. Switch to the dough hook, add the flour, and set a timer for 7 minutes, then walk away and find something else to do. Or clean up the kitchen a bit. Or read a book.
If you're doing it by hand, add the extra 1/2 cup of flour, keep going with the mixing with water implement you've been using. Or if you're like me, and like to get your hands dirty, put the implement down and start kneading the mixture gently in the bowl, turning it around to combine the last of the flour in there.
I must point out that this mixture is quite GOOPEY. No, really. You'll get sticky hands. I tend to have quite a few tablespoons of flour set out on the counter to distribute between the counter & the dough when I turn it out and start kneading it. I probably add an extra 1/8 cup of flour by the end of the kneading.
Knead by hand for 5 minutes, until it's elastic. It wont be goopey by this stage, but still a bit sticky.
Get out that microwaveable dish, and oil it up.

Place the dough in the oiled dish. I like to smoosh the oil around the dish with the dough and then turn the dough over so it's oily side up too. (Yes, the recipe also says this!)

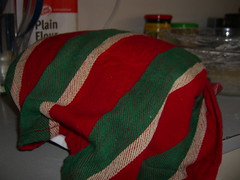
Get one of your two towels. Get it really wet (as in wow, this towel really need wringing out, but not so much that it's dripping all over your floor) and drap it over the dish.

Get your second towel, which is still nice and dry, and lay it over the first wet towel. Then put the towel-covered bowl in the microwave.
Microwave for 25 seconds, then rest for 5 minutes. Microwave for another 25 seconds, and rest of a good 15 minutes. Go read a book. Or wash the Kitchen Aid out. ;)
After that 15 minutes is up, take the bowl out of the microwave and this is what'll look like. Well, if your bowl is small like mine to fit in the smallish microwave.

See - all boofed up. Watch out for your wet cloth though - the dough always sticks to mine. Just use a knife (or like me the pastry cutter thingy) to help it separate from the cloth.
Before you get the dough out of that container, reach into your oven with some good oven mitts and lift the really-hot-by-now-container (casserole dish or dutch oven) out, and take the lid off, making it ready for the dough. Now, lift the dough out, and shape it into a ball.

Plop that baby into the dish. Slash the top of the dough if you like.

Cover the dish with the hot lid and put it back in the oven.
Put the timer on for 30 minutes.
Covering up the dish means that the bread cooks in a little bay of moisture, which helps form the most amazing crust.
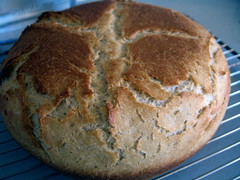
After 30 minutes, take the lid off the dish, and bake the bread for another 10 minutes. After that, this is what it'll look like out of the oven.
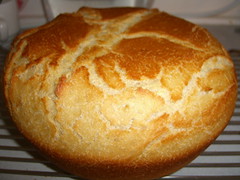
Good, isn't it. And that's all done in around an hour! When I took my bread out of the oven this afternoon, I realised that it had been an hour since I had been kneading the dough. So there you are - from knead, to baked in an hour!
I simply can NOT recommend this bread enough. The crumb is great, and the crust is simply fantastic. My partner LOVES the bread as toast the next day, and I have to restrain myself from cutting all the crust off the bread and eating it fresh out of the oven. In fact, the loaf that appears baked in this post is currently sitting on my bread board, missing two ends of crust...

See? If you'll excuse me, I think it's calling my name. Eaaat meeeee.
* * *
No-Time Bread
1 loaf
4 1/2 teaspoons active dry yeast (two packets)
1 tablespoon sugar
1 1/2 cups water
3 1/2 cups bread flour
1 1/4 teaspoon salt
3/4 teaspoon balsamic vinegar
In the bowl of a heavy-duty stand mixer put the yeast, sugar, and water and let it sit.
Heat the oven to 450°F. Put a Dutch oven (or one of these alternatives) in to warm as the oven heats. Get out your flour, salt, vinegar, spray oil, and anything else you need.
Now that the yeast has had a few minutes to bubble up, add 3 cups of the flour as well as the salt and vinegar and beat for several minutes with the paddle. Add the last 1/2 cup of flour and switch to the dough hook and beat for seven minutes. Alternately, knead vigorously for five minutes, or until the dough becomes extremely elastic. This will still be a wet dough, but not goopy. The dough will clear the sides of the bowl but still stick to the bottom.
Oil a microwave-safe bowl and transfer the bread dough to it, rolling it in the oil. Cover the bowl with a very wet towel. Cover the whole thing with a dry towel and put in the microwave for 25 seconds.
Let rest in the microwave for about five minutes.
Microwave for another 25 seconds, then remove.
Let rest and rise for another 15 minutes.
Shape into a ball and plop into the preheated pan. Quickly slash the top with a knife. Cover and bake for about 30 minutes, then remove the cover and bake for another 10 minutes, or until the crust is golden brown and the internal temperature hits 210.
No comments:
Post a Comment