Sundays mean scones to me. In my childhood, my Mum would often whip up a batch of fluffy scones for morning or afternoon tea on a Sunday, and they would be served hot, the batch wrapped up in a tea towel to stay that way, with whipped cream and jam. I learned how to make scones at my Mum's side, so it's been one of the recipes that I've always understood how it works, and how to put it together. I've never managed to have a flat, hard rock instead of a scone (instead of that one time that I put in plain flour and forgot the baking powder required to make it self-raising, but this is the last time that I shall mention this!). To me, a scone is made with flour & butter & milk, not flour and lemonade and something else. It puzzles me that there are recipes that include a fizzy liquid, however I can understand them. I've had family members that couldn't make a scone to save their life, and their results are hard enough to bounce off the floor and stay in one piece.
The feathery texture of scones are reliant on rubbing the butter in to the flour well, and not over-mixing or kneading the dough. However, it's not a disaster if you do - simply let the mixture sit for a while. Wrap it in plastic and pop it into the fridge, then let it come back to room temperature after 15 minutes or so. It's also a recipe that you perfect if you make it often enough. You wont need a recipe for them. My Mum doesn't need her recipe for them, and whilst my recipe is very water stained and flour covered, I now am almost at the stage of not needing the recipe either. And I am definitely AT the stage of knowing the mixture well enough - how it mixes, and comes together - to know how to add things. In fact, my excels-at-scone-making Mum now calls me for my Spinach & Cheese Scone recipe!
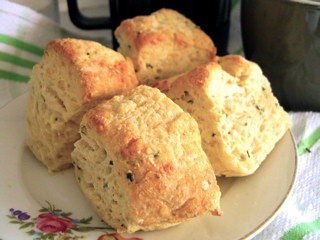
For a recent themed competition on another site, I produced these scones. The theme was cheese, and as soon as I saw it, I thought "Ooooh what an excuse to make cheesey scones!!" And they're so good. By themselves spread with butter than melts when they're still warm from the oven, or slightly toasted and eaten with soup the next day, you can't go past Cheese and Chive Scones!

Get out your ingredients: Plain Flour + Baking Powder (or Self-Raising Flour), Butter, Salt, Milk, Cheese & Chives! Pre-heat your oven to 220C (450F) - Very Hot. (I would recommend 200C if you've got a fan-forced oven.)
A quick note about Self-Raising Flour. This is a combination of 1 cup of Plain Flour and 2 teaspoons of Baking Powder.
Place (you can sift it in) 3 cups of Self-Raising Flour (3 cups plain flour & 6 tsp baking powder) into a bowl. Add a pinch of salt. Measure out 60gms of butter and cut it into little pieces into the bowl.

Rub the butter into the flour. This involved getting your hands into the bowl, and literally rubbing a piece of butter into some flour. Your end result is the breadcrumb-like mixture that you see above. (I assume, and I've never done this before, therefore can't recommend it, that you could do this process with a food processor, and end up with a breadcrumb-like result. If you give that a go, let me know.) I don't have a picture of me rubbing in the flour, because surprisingly enough, it's a messy process, and my camera is already dirty enough! It definitely didn't need my flour&butter-covered hands messing it more up!

Add two tablespoons (I've used a 'dessert' spoon here, since my tablespoon is covered in coffee at the moment, and a heaped dessert spoon is approximately a level tablespoon in my book) of chopped fresh chives. You could use dried, if that's all you've got. Fresh are just yummier :)

Add a cup of grated tasty cheese (or Cheddar).

Mmmmmm. Mix it all up gently until combined. (Do this by hand, if you've tried the food processor technique.

Make a shallow well in the centre and add a cup of milk. You can use buttermilk, as this will make it fluffier, and you can add sour milk (which is 1 cup of milk, soured with 1 tsp of white vinegar or 1 tsp lemon juice - a substitute for buttermilk), or you can just use plain milk. It's a personal preference. I would happily suggest that you try both methods for yourself and decide which you prefer!
The recipe book that the basic scone recipe for this post comes from - The Margaret Fulton Cookbook - is from 1968. That version of her Scone recipe uses 1 cup of milk. In her recently published updated version, she uses 1 cup of buttermilk. This is why I've given you both options here. She has given us both options as well!

Using a butter knife, "cut" the milk through the flour mixture until combined. Yes, you use a cutting motion. It works really well :) (If you've really got too much dry at the end of this, you can add a little bit more milk until it comes together a bit. You don't want a wet mixture though.) You may need to bring the mixture together with your hands at the end of the process, and this is fine. Just don't handle the mixture too much, otherwise it loses it's fluffy texture.
Sprinkle a bit of flour on your bench, and turn out your mixture. Pat it together. You want it about 3/4-1" thick - use a roller to achieve this, but use it lightly! You can use a scone-cutter (just a 5cm round cutter) to cut out nice neat circles of your mixture. You'll need to bring the edges of the mixture back together again to cut out more rounds. I don't have a cutter, so I just pat my mixture together into a vaguely square shape and cut it into squares with knife. Personal Preference!
(I don't have a picture of me cutting up the mixture, as like above, my hands were a wee bit too covered in scone mixture at this point, because I had to bring the mixture together with my hands!)

Ta da - all neat and cut out. Place your scones on a tray that's either got a piece of baking paper on it, or has been greased with butter and had a bit of flour shaken on to it as well.

"We're ready!!!" But not quite!!

Smear a bit of butter on the top of each scone. This helps the scones to brown well in the oven. If you like, you can sprinkle a bit more cheese on the top of them instead :D
Now you can pop them in the oven. They'll need between 10 -15 minutes. Check them at 10 minutes. They like to be brown on the top, so if they're not, keep them in there. If they look ready, just slide them out a bit and make sure that they're not undercooked on the sides.

Mmmmm. See how all the outside ones are nice and brown, and the inside ones aren't? Yeah, that's my old non-fan-forced crappy oven for you! They were actually cooked, but I've had this happen before, and the middle one's weren't cooked entirely around the sides. Which is why I say "Just make sure that...".

Open a couple up and butter them. Enjoy with coffee or tea. SO GOOD. The chives add a nice herby flavour to them, and combined with the savory of the cheese, it makes the scones just delectable.
Fantastic to whip up when you've got company coming around unexpectedly, or it's cold outside and you're in the mood for something savory. Also great with soup :)
Very Morish!
Cheese & Chive Scones
3 cups SR Flour (or 3 cups plain flour + 6 tsp baking powder)
60gms Butter
Pinch of Salt
1 cup Milk (or Buttermilk)
1 cup tasty Cheese/Cheddar
2 tblsp Fresh Chives
Preheat oven to 220C/450F (200C for fan-forced). Sift flour & salt into a bowl. Rub the butter through the flour until it resembles breadcrumbs. Make a well in the centre and pour in the milk. Cut mixture with a knife, adding a bit more milk if necessary.
Turn out mixture onto a floured bench, and bring together lightly with your hands. Pat, or roll, mixture to 3/4-1" thickness. Cut out into rounds, or squares, and place on a tray, lightly greased & floured, or lined with baking paper. Smear a bit of butter onto each scone.
Bake for 10-15 minutes, until tops are brown. Serve warm with butter.
Enjoy.
No comments:
Post a Comment