I had a meeting approaching, with a small group of people that I know through a discussion board online. I thought I should go along with some baking. And since I had really wanted to give this recipe a go, I thought - why not! So, I give you:
Cinnamon Rolls - Recipe by the Pioneer Woman!
I have used the Ree's recipe from www.thepioneerwomancooks.com for my cinnamon rolls. It can be found here @ the pioneer woman cooks . com. She has set out the recipe in a very easy to read and interpret form, which I'm going to... *cough* borrow, here. I like it. I'm also however going to write the recipe out, with the ingredients that you need.
CINNAMON ROLLS!
1 litre full cream milk
1 cup vegetable oil (I used Canola)
1 cup sugar
9 cups plain flour + extra for dusting
2x 7g sachets of instant yeast
1 tsp baking powder
1 tsp baking soda
500gm+ butter + extra for greasing tins
2-3 cups sugar
50gm cinnamon (approx.)
7-9 9" tins (disposable - so easy clean up!)
Place the litre of milk, cup of oil and first cup of sugar into a big pot and heat until scalding - just before it boils. Then take it off the heat, and let it cool until it is lukewarm. (This is approximately 45 mins - 1 hr.) When it has cooled, add the two packets of yeast, and let sit until the yeast activates and gets all happy in there. Then turn in 8 cups of flour, and stir it together. Leave it for an hour, and it will look like this!

See, all mixed together and happy. I know it doesn't look much, but that's because of the pot! It's a massive pot I borrow from work, and it's actually raised quite a bit at this point.

Then you add a cup of flour, to this mix, although with a 1 heaping teaspoon of baking powder, and 1 scant (not quite full) teaspoon of baking soda. Mix it all together and leave it alone.

See - all mixed together. Now we're going to cover it.
I wanted to make sure that it was sealed, and I didn't have any plastic wrap so firstly:

I put some foil over it, and then I:

Covered it with a tea towel and left it alone to rise. In fact, I left the house for a few hours and went into town at this point. If you like, you can put it in the fridge overnight until you want to use it as well.

It's been a few hours. Let's see what's under the 'lid'! First the tea towel..

Then the layer of foil...

Wooohh!!!

WOW look at that rise! This is what your dough will look like after a couple of hours on a nicely warm afternoon. If it's overflowing out of your pan, you can tap the pan down, like I did...

And it'll sink. This was fun!
OK, at this point, you're looking at turning part of the dough out of the pan to work with. I scrapped the sides of my pan down, and got my dough in a semi-neat lump at the bottom of the pan, and then divided it into three, because hey - I don't have that much bench space. If you've got lots of lovely bench space, please feel free to do what Ree-The-Pioneer-Woman does, and divide it into half.

Flour your bench liberally. The dough is pretty sticky, so you want to have a nice layer of shaken out flour on that surface.

Turn out your half (or third) of dough onto the bench. Start spreading it out with your fingers.

Until you have a nice rectangle of dough to work with. Then get your rolling pin (or wine bottle) and roll that dough out, keeping the rectangle shape as much as you can manage.

The thickness of your dough at this stage will determine how thick your rolls are at the end. The thinner the dough, the more 'scrolls' you'll get in your rolls. The thicker the dough, the "thicker" each layer of roll, and possibly the less scrolls your get. Mine's pretty thin. Now, for the filling. Melt a pad of butter, and get approximately a cup of melted butter ready in a little jug.

Pour the butter over the dough. Don't be stingy, but on my third of dough, I didn't use quite a cup of butter. Ree-The-Pioneer-Woman says to slather 1 1/2 - 2 cups of melted butter on each half of rolled dough, but I'd say 1 cup is plenty. Up to you, but start with at least that 1 cup.

Spread that butter out on the dough, where the pouring of it didn't reach, until it's all nice and buttery.

Sprinkle up to a cup of sugar over the dough. I used 'normal' sugar, but may try caster (a finer) sugar next time. This may reduce the amount of sugar I need down to 1/2 cup, per 1/3 of dough.

Sprinkle cinnamon liberally over the sugared dough. Don't be afraid of using all that cinnamon. You want it nice and cinnamony. See the little packet of cinnamon I had? it says it's 25gms in there, and I used at least half the packet, to three quarters of it on each third. Be one with the cinnamon. Make sure it covers all of the dough.

Taking one long edge of dough, roll it firmly up towards you.
Gosh it's hard taking a photo whilst trying to hold that roll of dough from unraveling. Sorry about the unfocasedness of it, and the darkness. (Don't have photoshop yet!)

See - a nice tight roll of dough. That's what you want.

Get a sharp knife, and cut the dough into segments, 3/4 to 1 inch thick.

You get a lot of little rolls out of a thinly rolled out lot of dough. Place these little rolls of dough into a greased tin.
I bought 9 disposable tins with lids when I was preparing for this. Glad I did because this little roll of dough? Took up 3 tins! I spread 3 teaspoons of melted butter into each tin and greased them.

See how happy they look there? Awww. Like peas in a pod.
Repeat this process with the other 2 parts (or half) of the dough. I ended up with 9 full tins. Ree-The-Pioneer-Woman ends up with 7. I reckon the difference is in the rolling out of the dough.
At this point, you've got a couple of options. You can leave the dough to rise for about 20 minutes, or you can put them in the fridge and bake them in the morning, or you can pop them in the freezer until needed. Make sure, if using the fridge or freezer, they're well covered. I did both the latter options, and they worked out great :)
Preheat your oven to 400 degrees F (or 200 degrees C) and bake the rolls for 15-18 minutes. Watch them, as they'll need to come out when they're nice and lightly golden brown on top, but not too brown! In a fan forced oven, their nice and light brown at 13-15 minutes, and in my old crappy non-fan forced oven, it took 20-25. Go figure!
FROSTING
1 kg bag of icing sugar
2 tsp maple flavouring (or vanilla - I used vanilla)
1/2 cup of milk
1/4 cup melted butter
1/4 cup of strongly brewed coffee
A generous pinch of salt (Ree says 1/8 tsp)
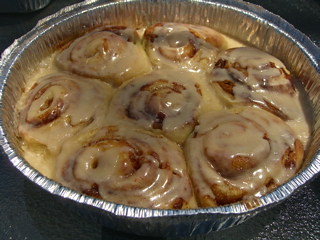
Mix it all together! This is the frosting that Ree-The-Pioneer-Woman pours over her buns! They look like this afterwards.

See! How awesome do they look!
Nom nom nom.
Enjoy with friends :)
No comments:
Post a Comment